Latest update: August 3rd 2021
Planned launch time is on Saturday, July 17th between 7:00-8:00 UTC. We will begin flight preparations already at 6:00 UTC. In case we need to cancel the flight because of bad weather, we will attempt to launch the balloon again either on Sunday, July 18th or on Saturday, July 31st.
Follow the YouTube live stream from launch site!
OH3VHH is the call sign for an amateur radio high-altitude balloon flight organized by Hämeenlinnan Radioamatöörit amateur radio club, call sign OH3AA, in Finland. The primary purpose of the flight is to be a scientific experiment: to test a variety of radio transmitters for tracking the balloon and to record video and photos during the flight.
The people involved in planning the flight and building the equipment are Jari OH3UW, Sami OH3EYZ and Mikael OH3BHX. Special thanks to SRAL (The Finnish Amateur Radio League) and Traficom (The Finnish Transport and Communications Agency) for help in getting permits for the radio transmitters and the flight.
We will publish updates about the flight on this page. Additionally, Mikael OH3BHX also tweets updates about the flight and its preparations on his Twitter account @mikaelnou.
There is also more information about the flight shared as posts in this blog:
-
OH3VHH-1 launch and flight, including photos and videos
Flight videos
For full details and photos of the flight, see the page OH3VHH-1 launch and flight.
See highlights from the flight on the following video clip:
There is also a longer version of the video, including the flight preparations:
Additionally, you can still watch the full YouTube live stream from launch site!
Overview of radio transmitters
This high-altitude balloon payload contains the following the radio transmitters:
-
A Raspberry Pi-based DVB-S1 transmitter for broadcasting a live video stream from the balloon on 70cm band. Anyone with a suitable high-gain yagi and an affordable SDR received, such as an RTL-SDR stick, can attempt to receive the live video stream. The range of the video transmission is expected to be around 100-200 kilometers.
-
An Arduino-based APRS tracker called Trackuino transmitting APRS packets on 2m band (144.800 MHz).
-
A reprogrammed Vaisala RS41 radiosonde transmitting APRS packets on 70cm band (432.250 MHz).
-
Custom Raspberry Pi-based tracker software, developed by Mikael OH3BHX, taking photos and recording sensor telemetry, which both are also exposed by a LoRa transmitter on 70cm band.
Tracking and following the flight
However, it is possible to track the balloon even without any radio equipment: the 2m APRS tracker transmissions should get automatically picked up by local APRS repeaters and IGate devices, so it should be possible to follow the balloon location in aprs.fi using call sign OH3VHH-11:
Additionally, we will attempt to provide a YouTube live video stream from the launch site on the Finnish Amateur Radio League YouTube channel. The video stream will include the DVB-S1 video transmission from the balloon.
Follow the YouTube live stream from launch site!
In case you’re located in Finland and you wish to set up your own radio equipment, see the radio equipment list below for more details about the radio transmitters and information on how to receive each type of transmission.
Flight launch schedule
Planned launch time is on Saturday, July 17th between 7:00-8:00 UTC. We will begin flight preparations already at 6:00 UTC. In case we need to cancel the flight because of bad weather, we will attempt to launch the balloon again either on Sunday, July 18th or on Saturday, July 31st.
-
UPDATE: Launch happened on July 17th at around 9:00 UTC
-
Planned launch location: near Hämeenlinna, Finland
-
Planned flight time: 90 minutes, actual flight time 1h 25min
-
Estimated ascent rate: 5 m/s, actual ascent rate: 7-8 m/s
-
Maximum estimated altitude: 27-30 kilometers, maximum altitude reached: 28.3 kilometers
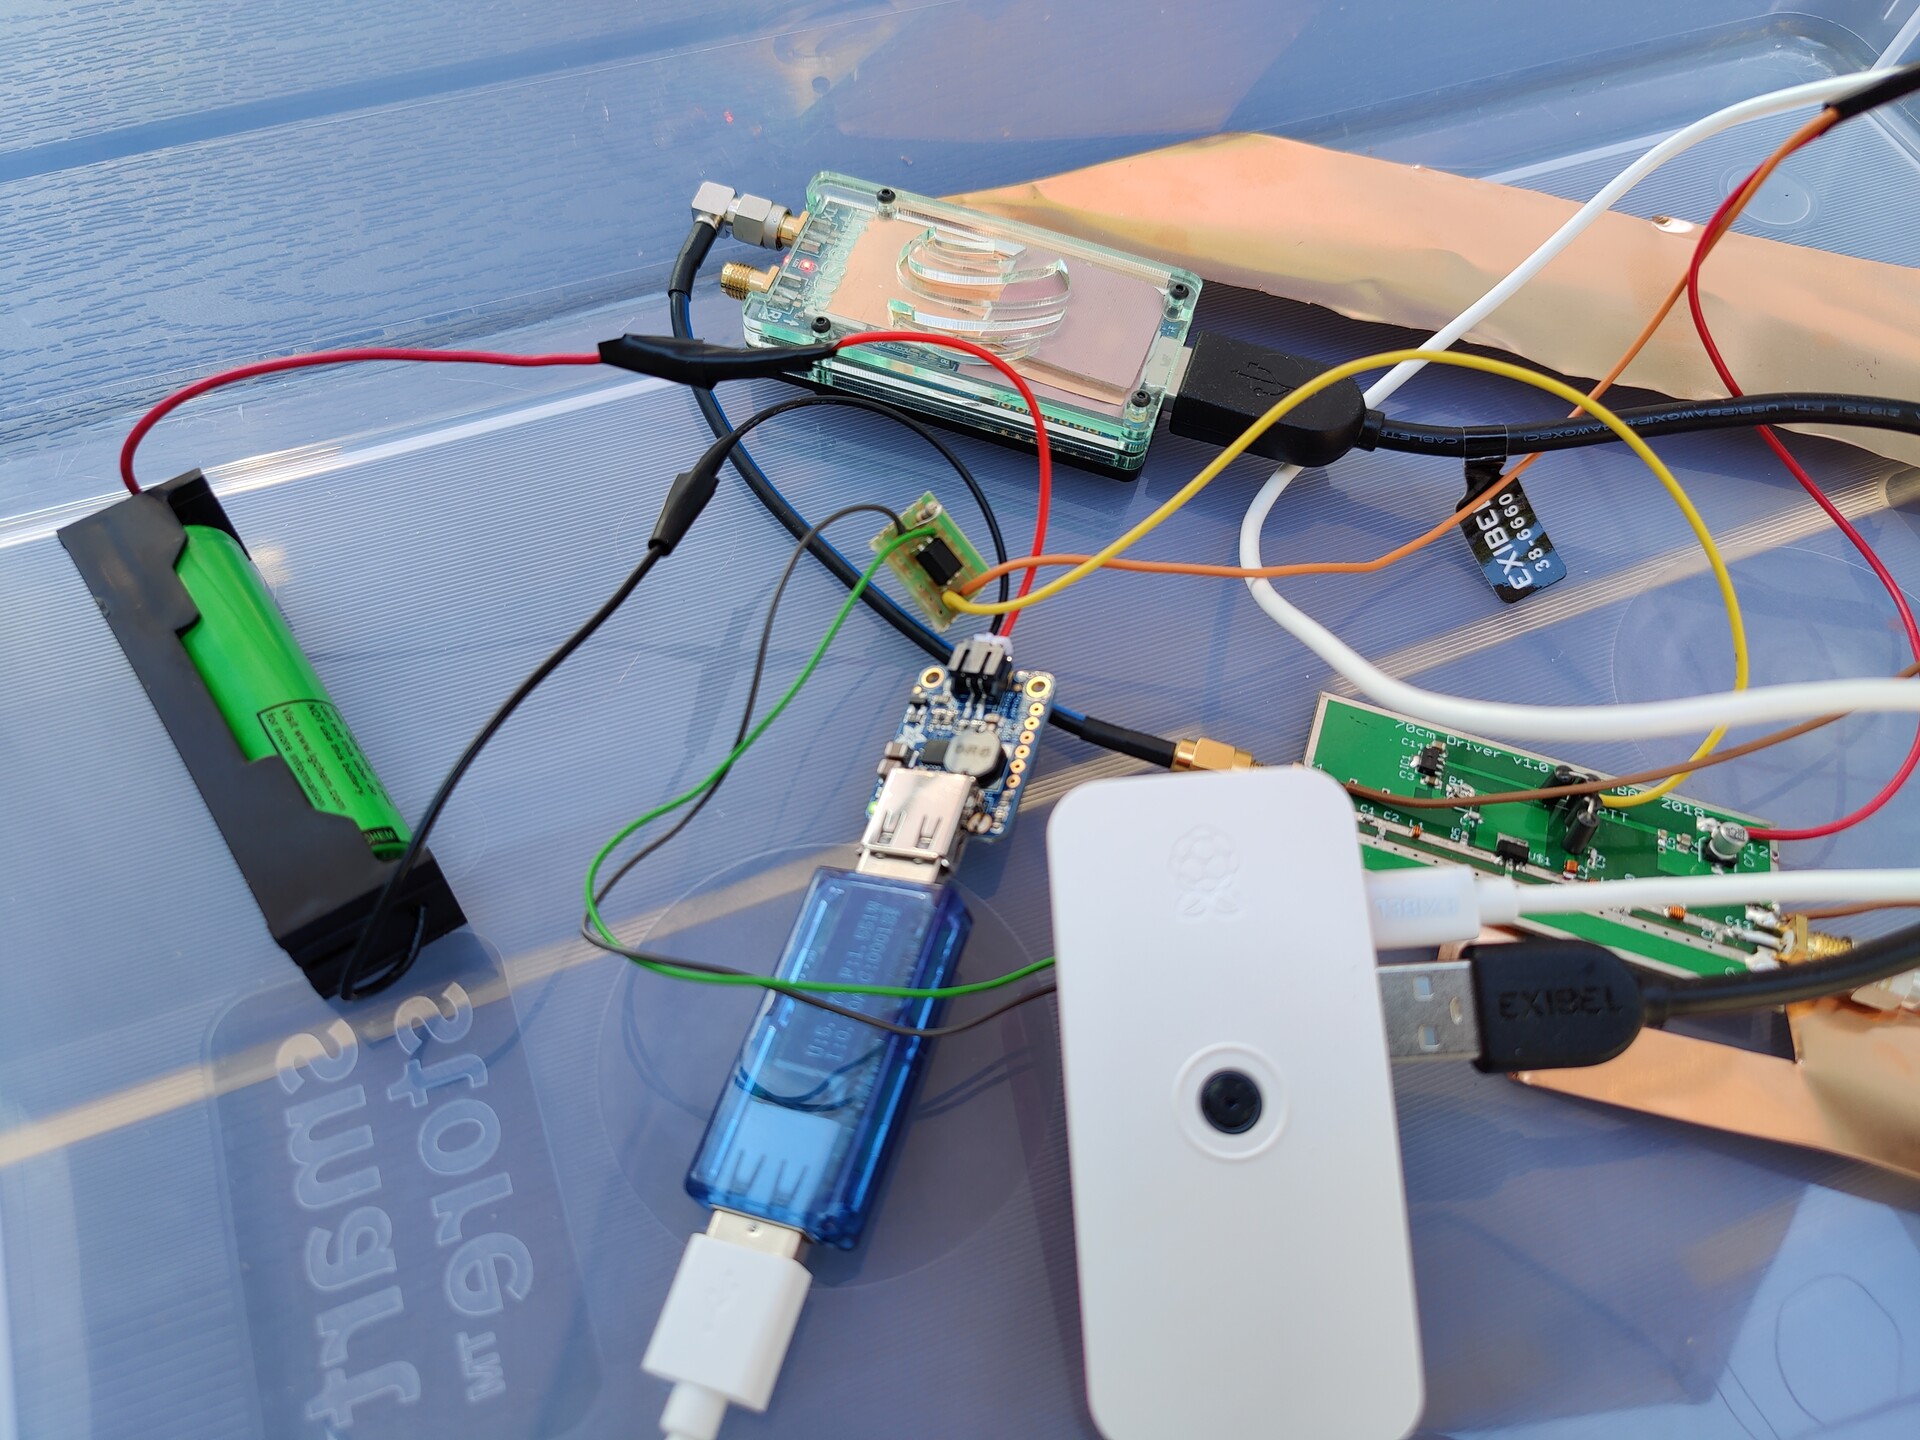
Flight equipment
The balloon is a Hwoyee 800 gram latex balloon, but we have some older Totex 1200 gram balloons we can use as a backup, depending on what the final payload weight will be.
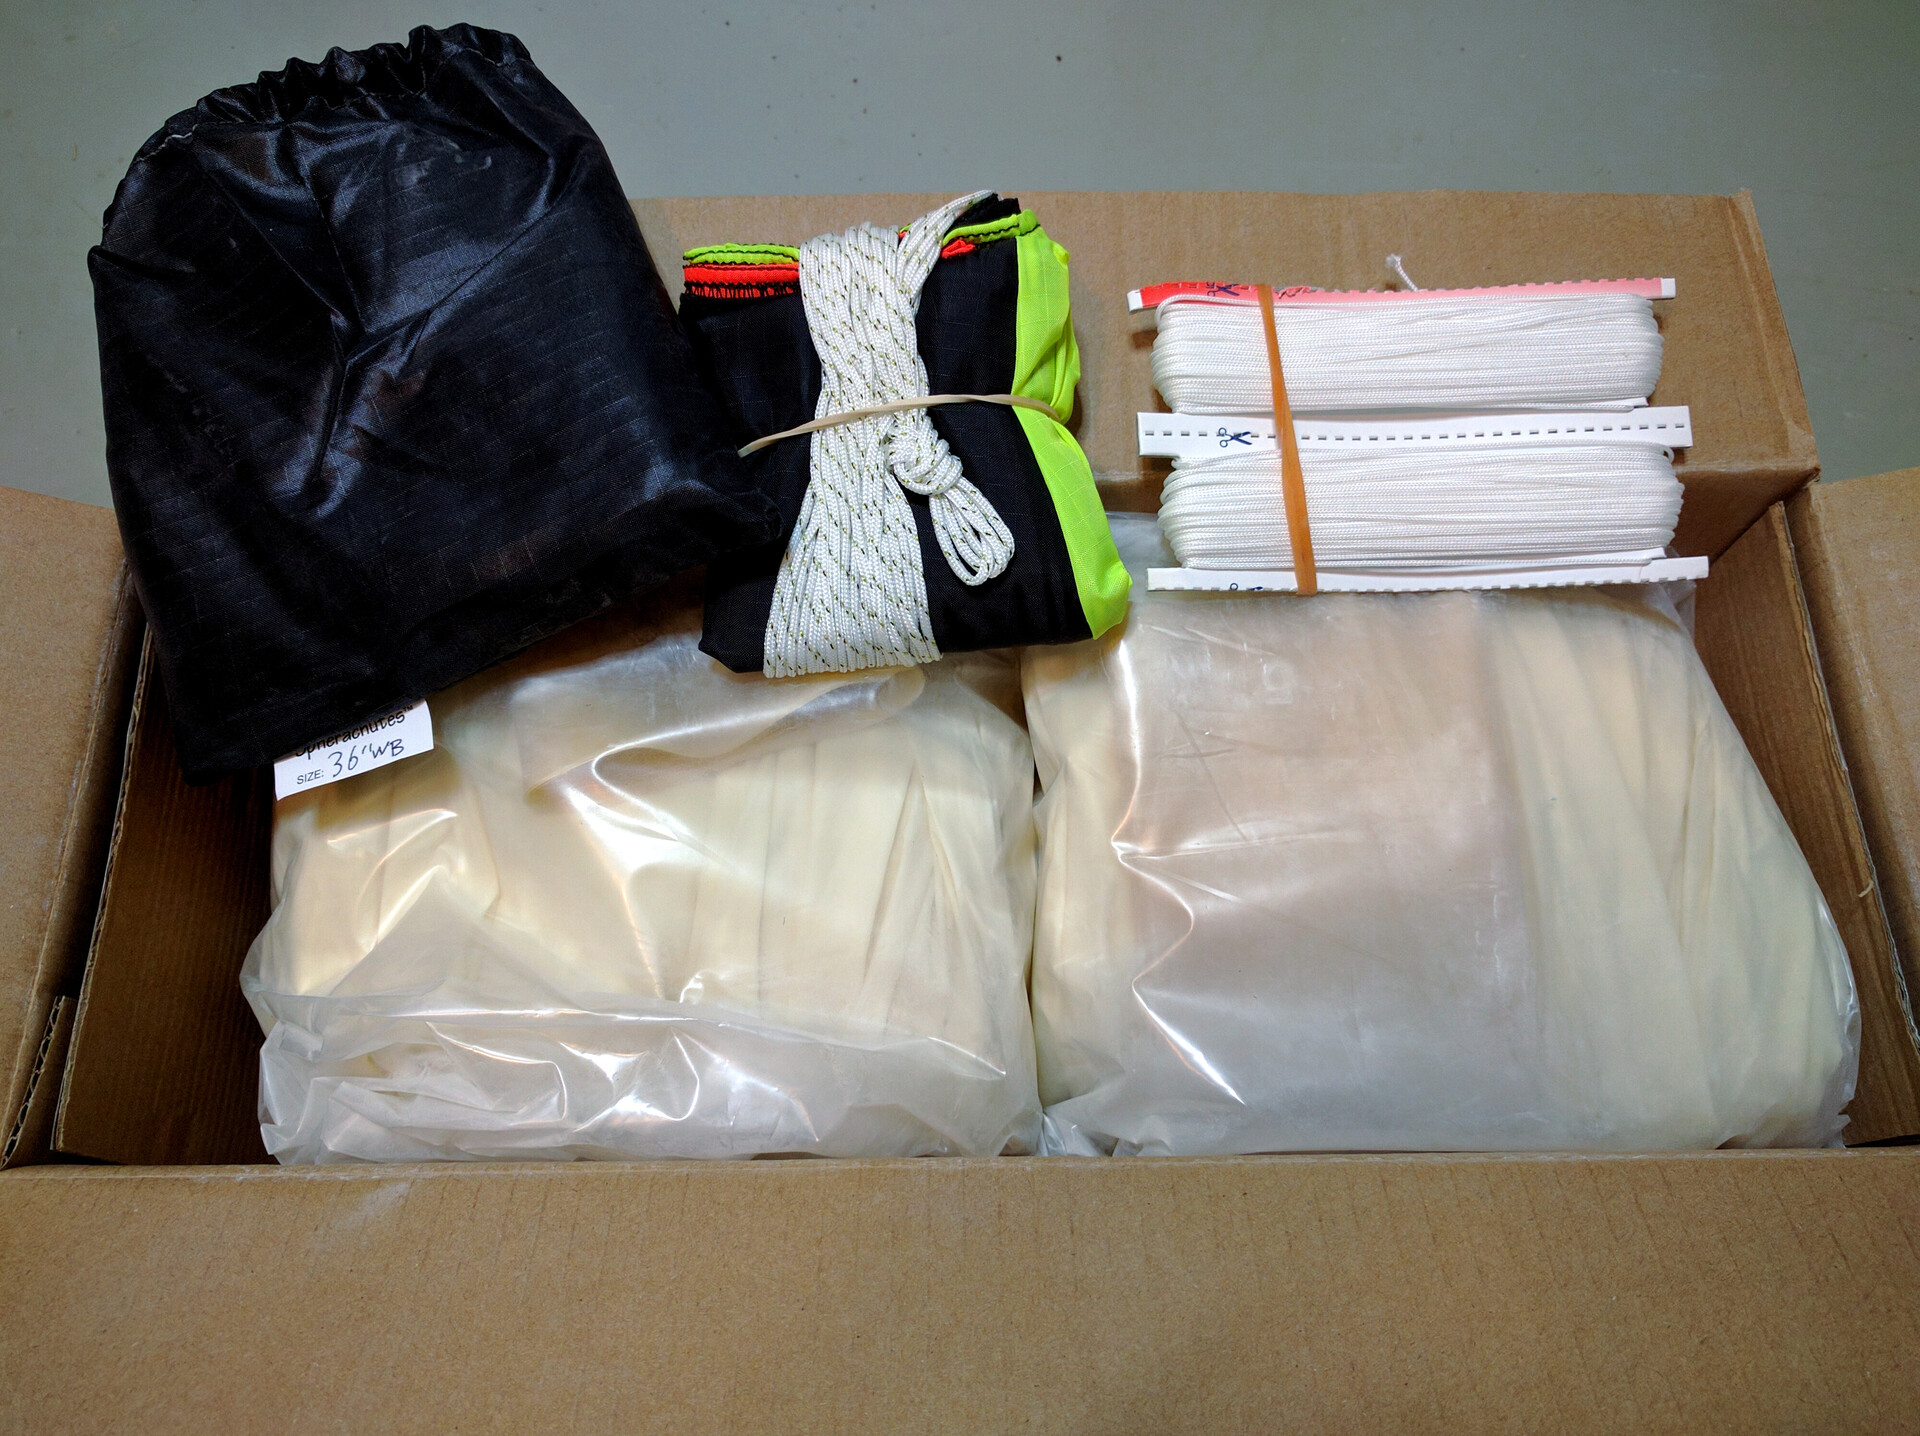
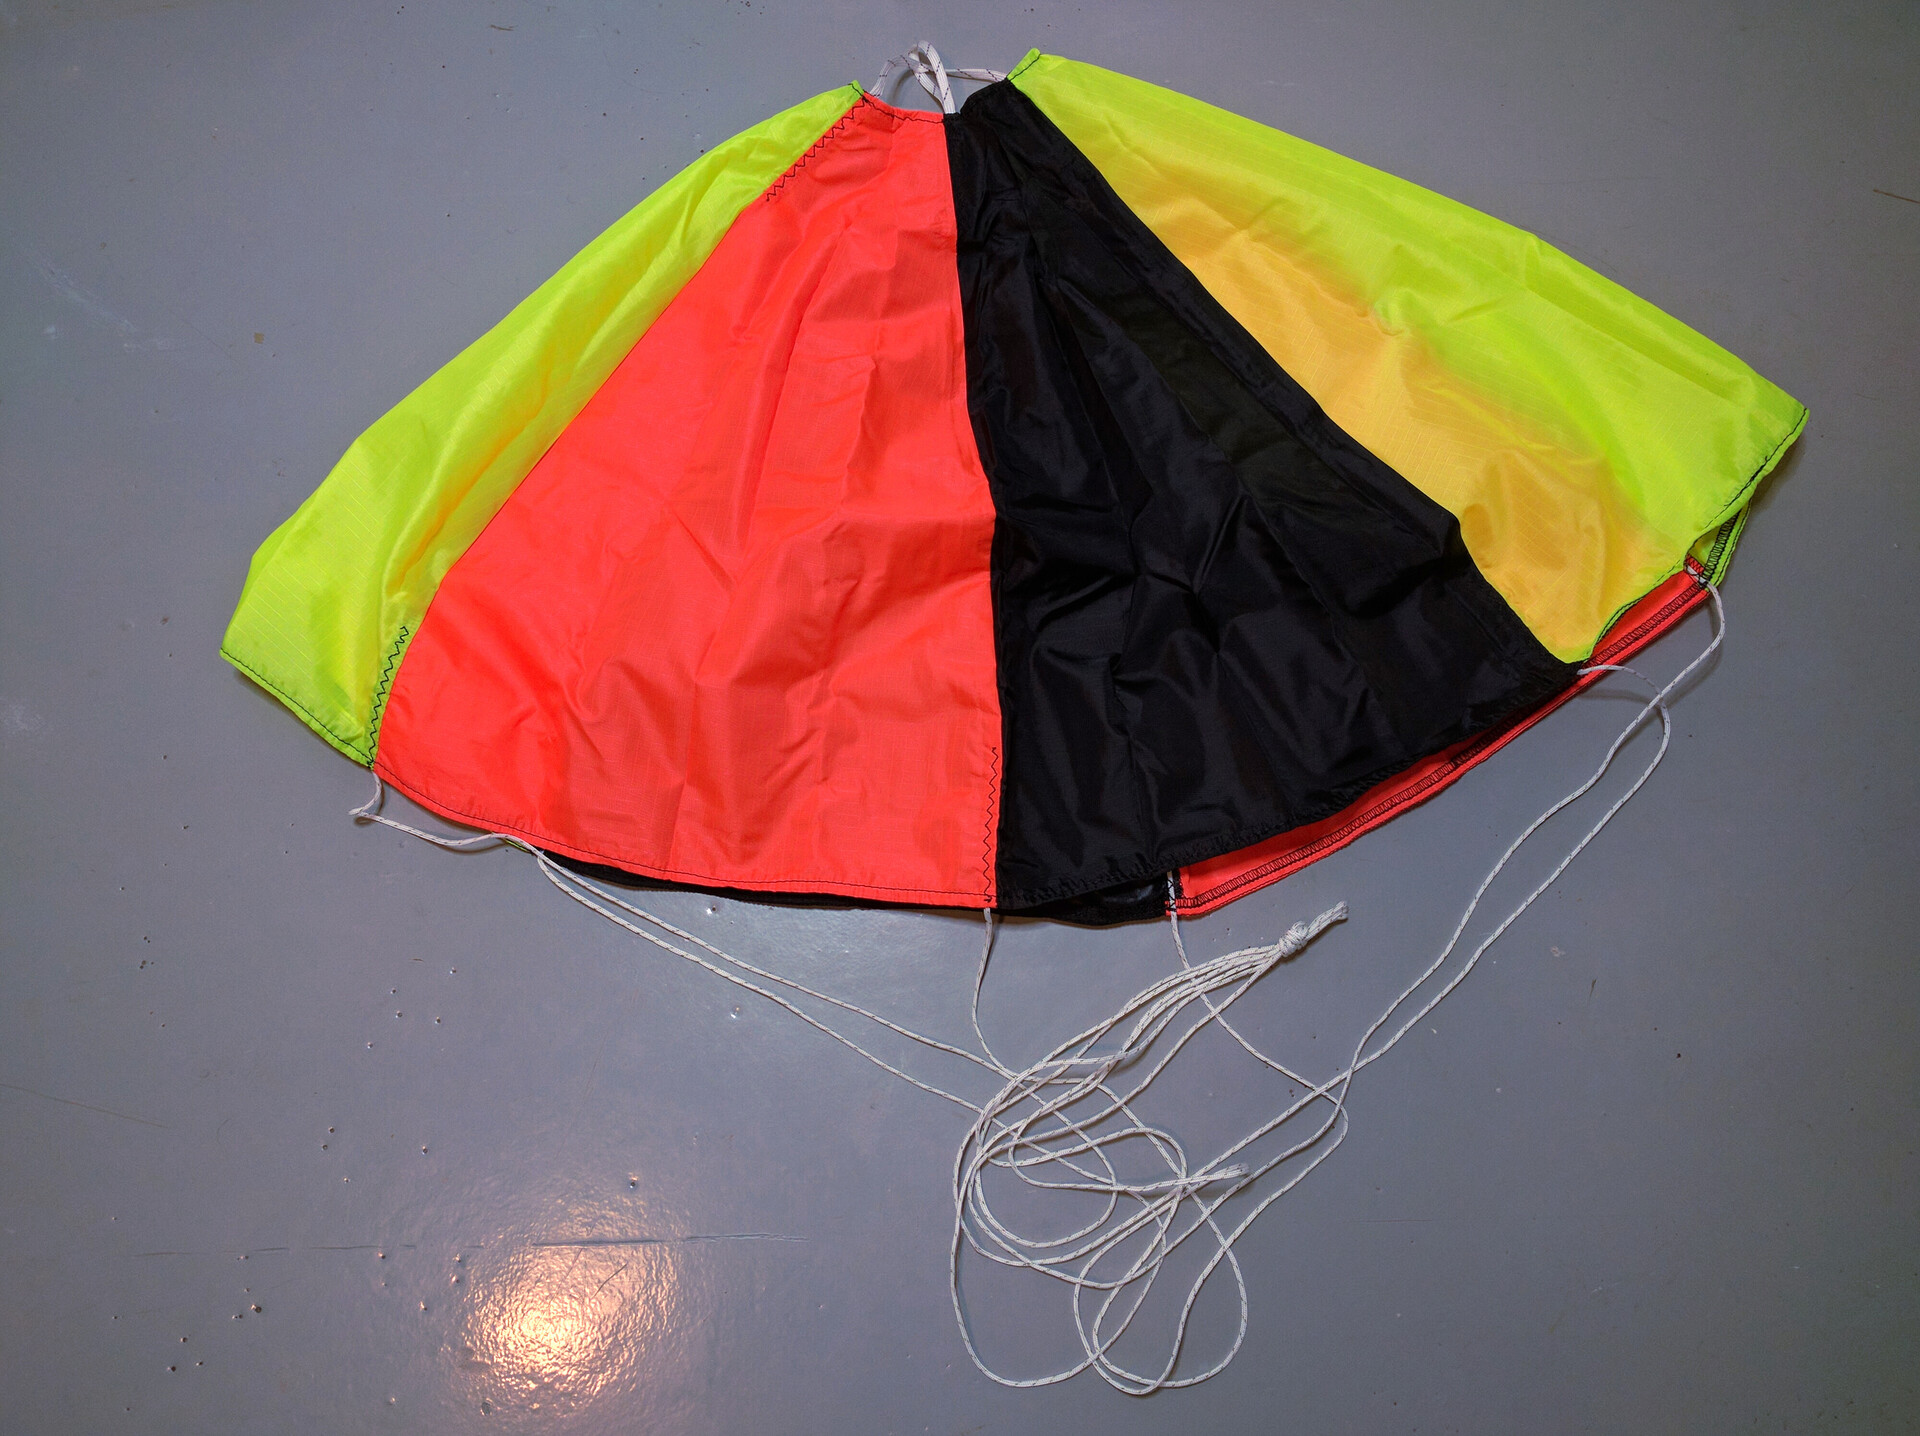
The parachute is a Spherachute 36-inch model.
The cord used to connect the balloon, the parachute and the payload is 1mm braided nylon cord, also from Random Engineering. The cord breaking strain is approximately 22.5Kg / 220N.
The payload enclosure is a styrofoam box with wall thickness of 40mm and outside measures of 263 x 241 x 237mm.
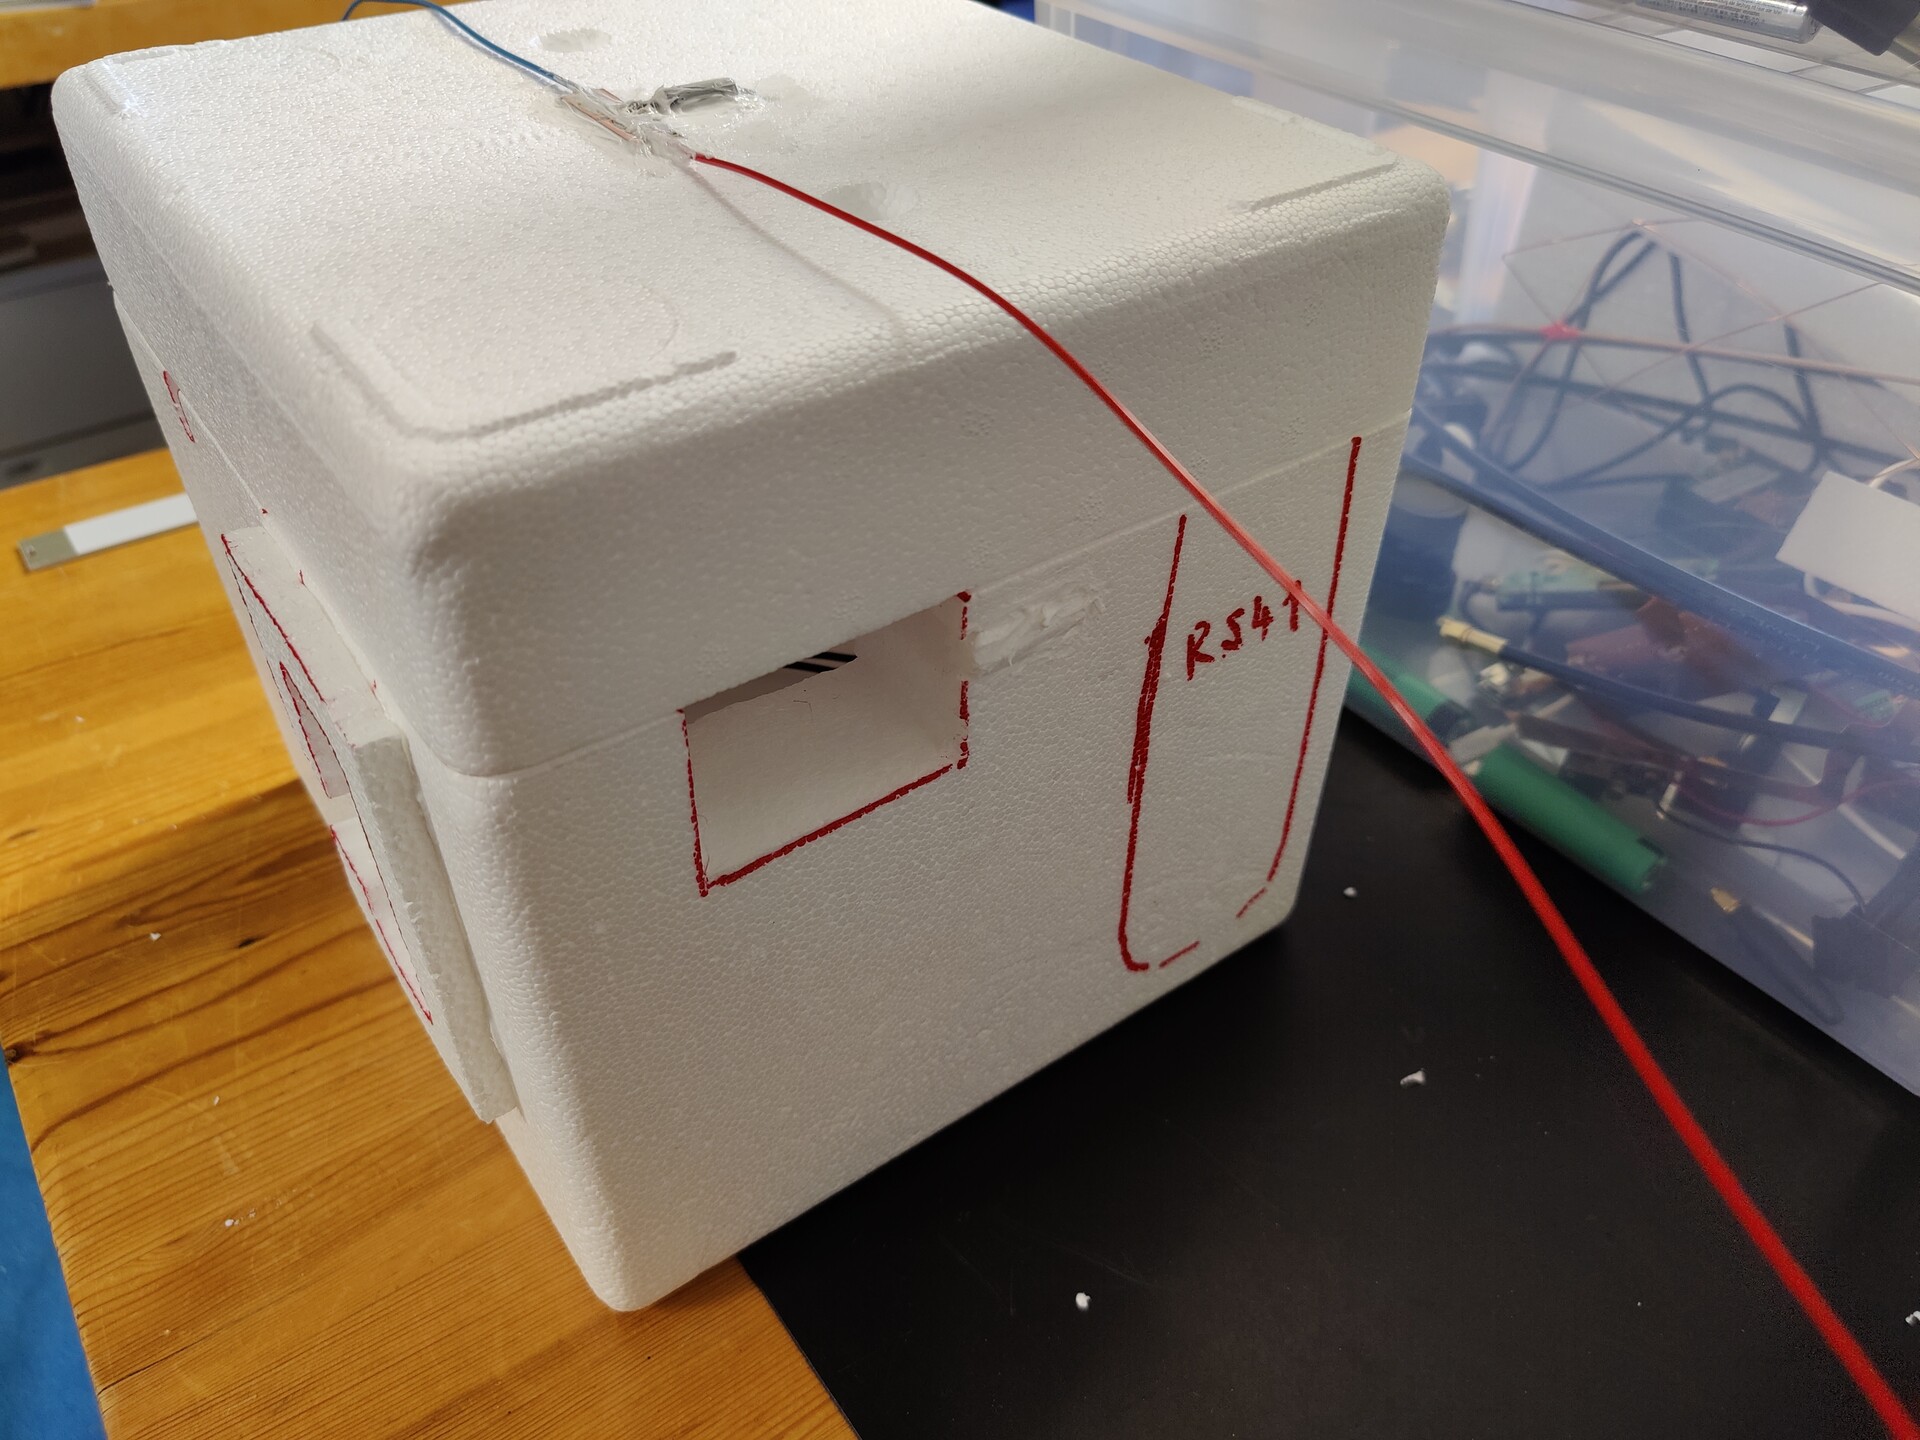
The payload contents consist of batteries, radio tracker/transmitter devices and cameras.
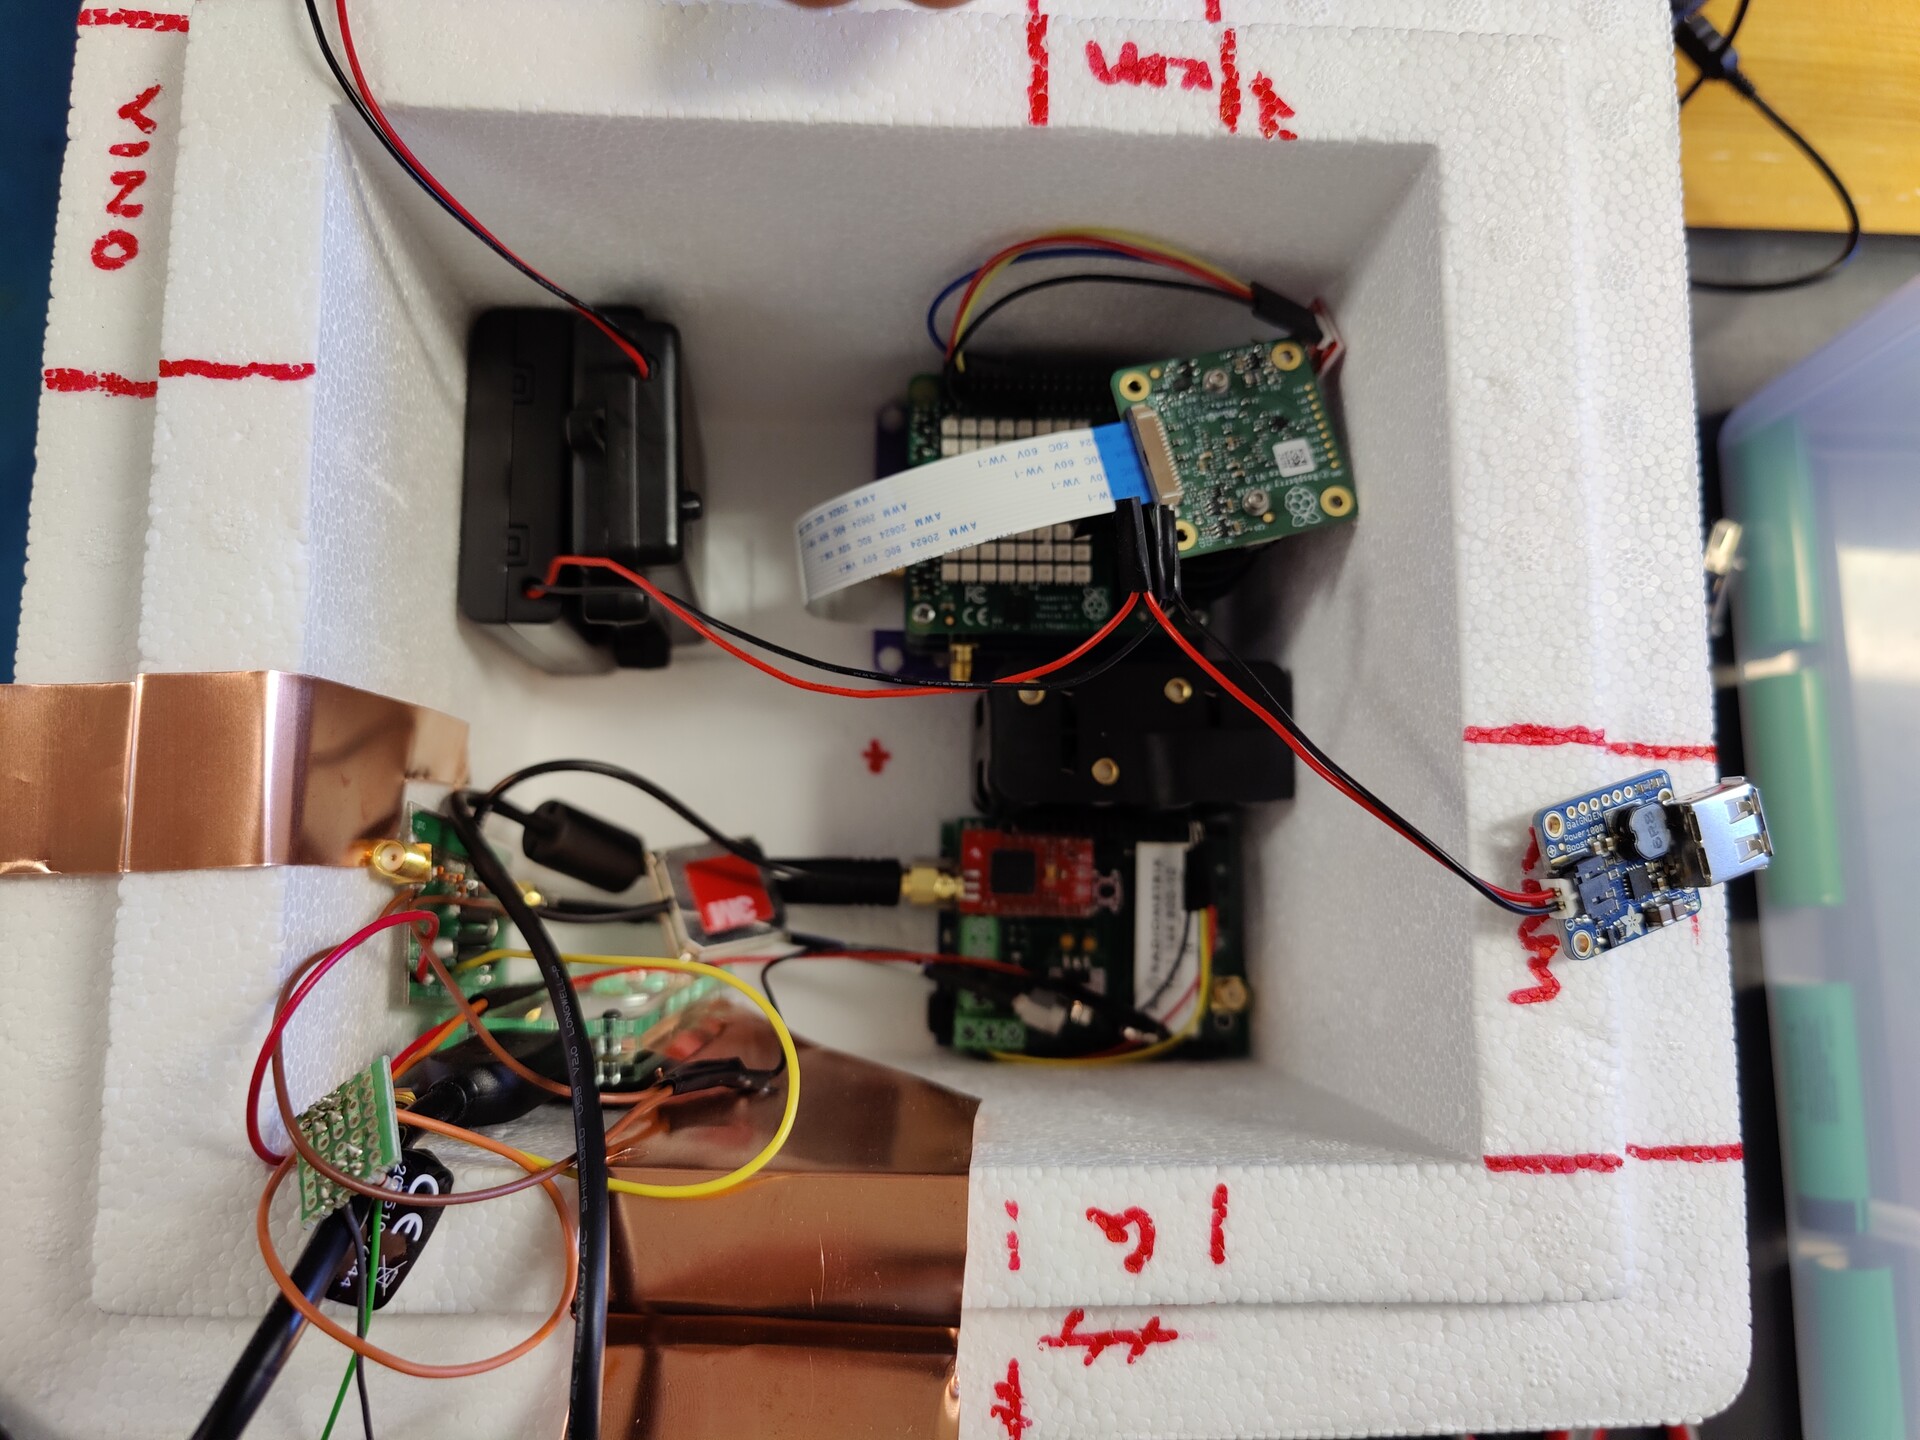
Radio equipment
APRS tracker for 2m band: Trackuino
The 2m APRS tracker is an Arduino-based tracker device called Trackuino (see build instructions for more information).
-
Frequency: 144.800 MHz (standard APRS frequency on 2m band)
-
Transmit power: 300mW
-
Antenna: 2m dipole (built by Jari OH3UW)
-
Transmit interval: 29 seconds
-
Call sign: OH3VHH-11
-
Powered by:
-
3x Panasonic Eneloop Pro 1.2V 2500mAh rechargeable AA battery
-
Adafruit PowerBoost 1000 Basic - 5V USB Boost @ 1000mA from 1.8V+
-
Receiving APRS packets
The APRS packets can be received using any standard 1200 baud narrow-FM APRS receiver.
You can build an affordable and easy APRS IGate receiver using an RTL-SDR receiver USB stick and the Direwolf software, which delivers APRS data to the APRS Internet Service. This data is visible in the https://aprs.fi/ website, for example. For more information about using Direwolf, see: Setting up a Raspberry Pi based APRS RX IGate with an RTL-SDR.
For a Windows-based solution using APRSISCE, see Decoding APRS with SDR#, APRSISCE32 and an RTL-SDR.
APRS tracker for 70cm band: A reprogrammed Vaisala RS41 radiosonde
The Vaisala RS41 radiosondes can be reprogrammed to transmit APRS packets on 70cm band. They are used extensively for atmospheric sounding by the Finnish Meteorological institute and thus easily available in Southern Finland to be collected once they land, an activity called radiosonde hunting (YouTube presentation).
A radiosonde works well as an APRS tracker because they’re free to collect, and they’re very lightweight devices, specifically built for high-altitude balloon tracking.
More information about reprogramming RS41 radiosondes is available at:
The OH3VHH RS41 radiosonde uses a custom firmware called RS41ng developed by Mikael OH3BHX. This firmware allows use of external I²C sensors and customizable APRS messages. In addition, there is preliminary support for transmitting WSPR/FT8/FSQ on HF using a Si5351 clock generator.
-
Hardware: A Vaisala RS41-SG radiosonde with an external BMP280 sensor
-
Sensors: GPS location, internal temperature, external temperature, relative humidity, atmospheric pressure
-
Frequency: 432.500 MHz (standard APRS frequency on 70cm band)
-
Transmit power: 60mW
-
Antenna: Built-in 1/4-wave whip
-
Transmit interval: 10 seconds
-
Call sign: OH3VHH-11
-
Powered by: 2x Energizer Ultimate Lithium batteries for good performance in extremely low temperatures
Receiving APRS packets
The APRS packets can be received using any standard 1200 baud narrow-FM APRS receiver.
You can build an affordable and easy APRS IGate receiver using an RTL-SDR receiver USB stick and the Direwolf software, which delivers APRS data to the APRS Internet Service. This data is visible in the https://aprs.fi/ website, for example. For more information about using Direwolf, see: Setting up a Raspberry Pi based APRS RX IGate with an RTL-SDR.
For a Windows-based solution using APRSISCE, see Decoding APRS with SDR#, APRSISCE32 and an RTL-SDR.
Custom LoRa tracker for 70cm band: Embedded Radio Tracker
Embedded Radio Tracker software is a custom Raspberry Pi-based high-altitude balloon tracker developed by Mikael OH3BHX. The tracker collects sensor data and takes still photographs saving them all to the Raspberry Pi SD card for later analysis. Additionally, the tracker transmits sensor telemetry data and thumbnail images using 255-byte LoRa packets. The data format is a custom binary protocol.
-
Hardware:
-
Sensors: GPS location, internal temperature, relative humidity, atmospheric pressure, 3D accelerometer, 3D magnetometer
-
Frequency: 434.250 MHz
-
Transmit power: 100mW
-
Antenna: 70cm dipole made of copper tape (built by Jari OH3UW)
-
Transmit interval: nearly continuous
-
Transmitted data: sensor telemetry, thumbnail photos
-
Powered by
-
4x Panasonic Eneloop Pro 1.2V 2500mAh rechargeable AA battery
-
Adafruit PowerBoost 1000 Basic - 5V USB Boost @ 1000mA from 1.8V+
-
LoRa telemetry reception
The data can be received on a Raspberry Pi using the Embedded Radio Tracker software open-source software and suitable LoRa receiver hardware, see the GitHub repository and the hardware links below.
As this is a custom tracker, we’ve built our own receiver devices for it:
See the post about Embedded Radio Tracker software and hardware if you wish to know more about the LoRa tracker.
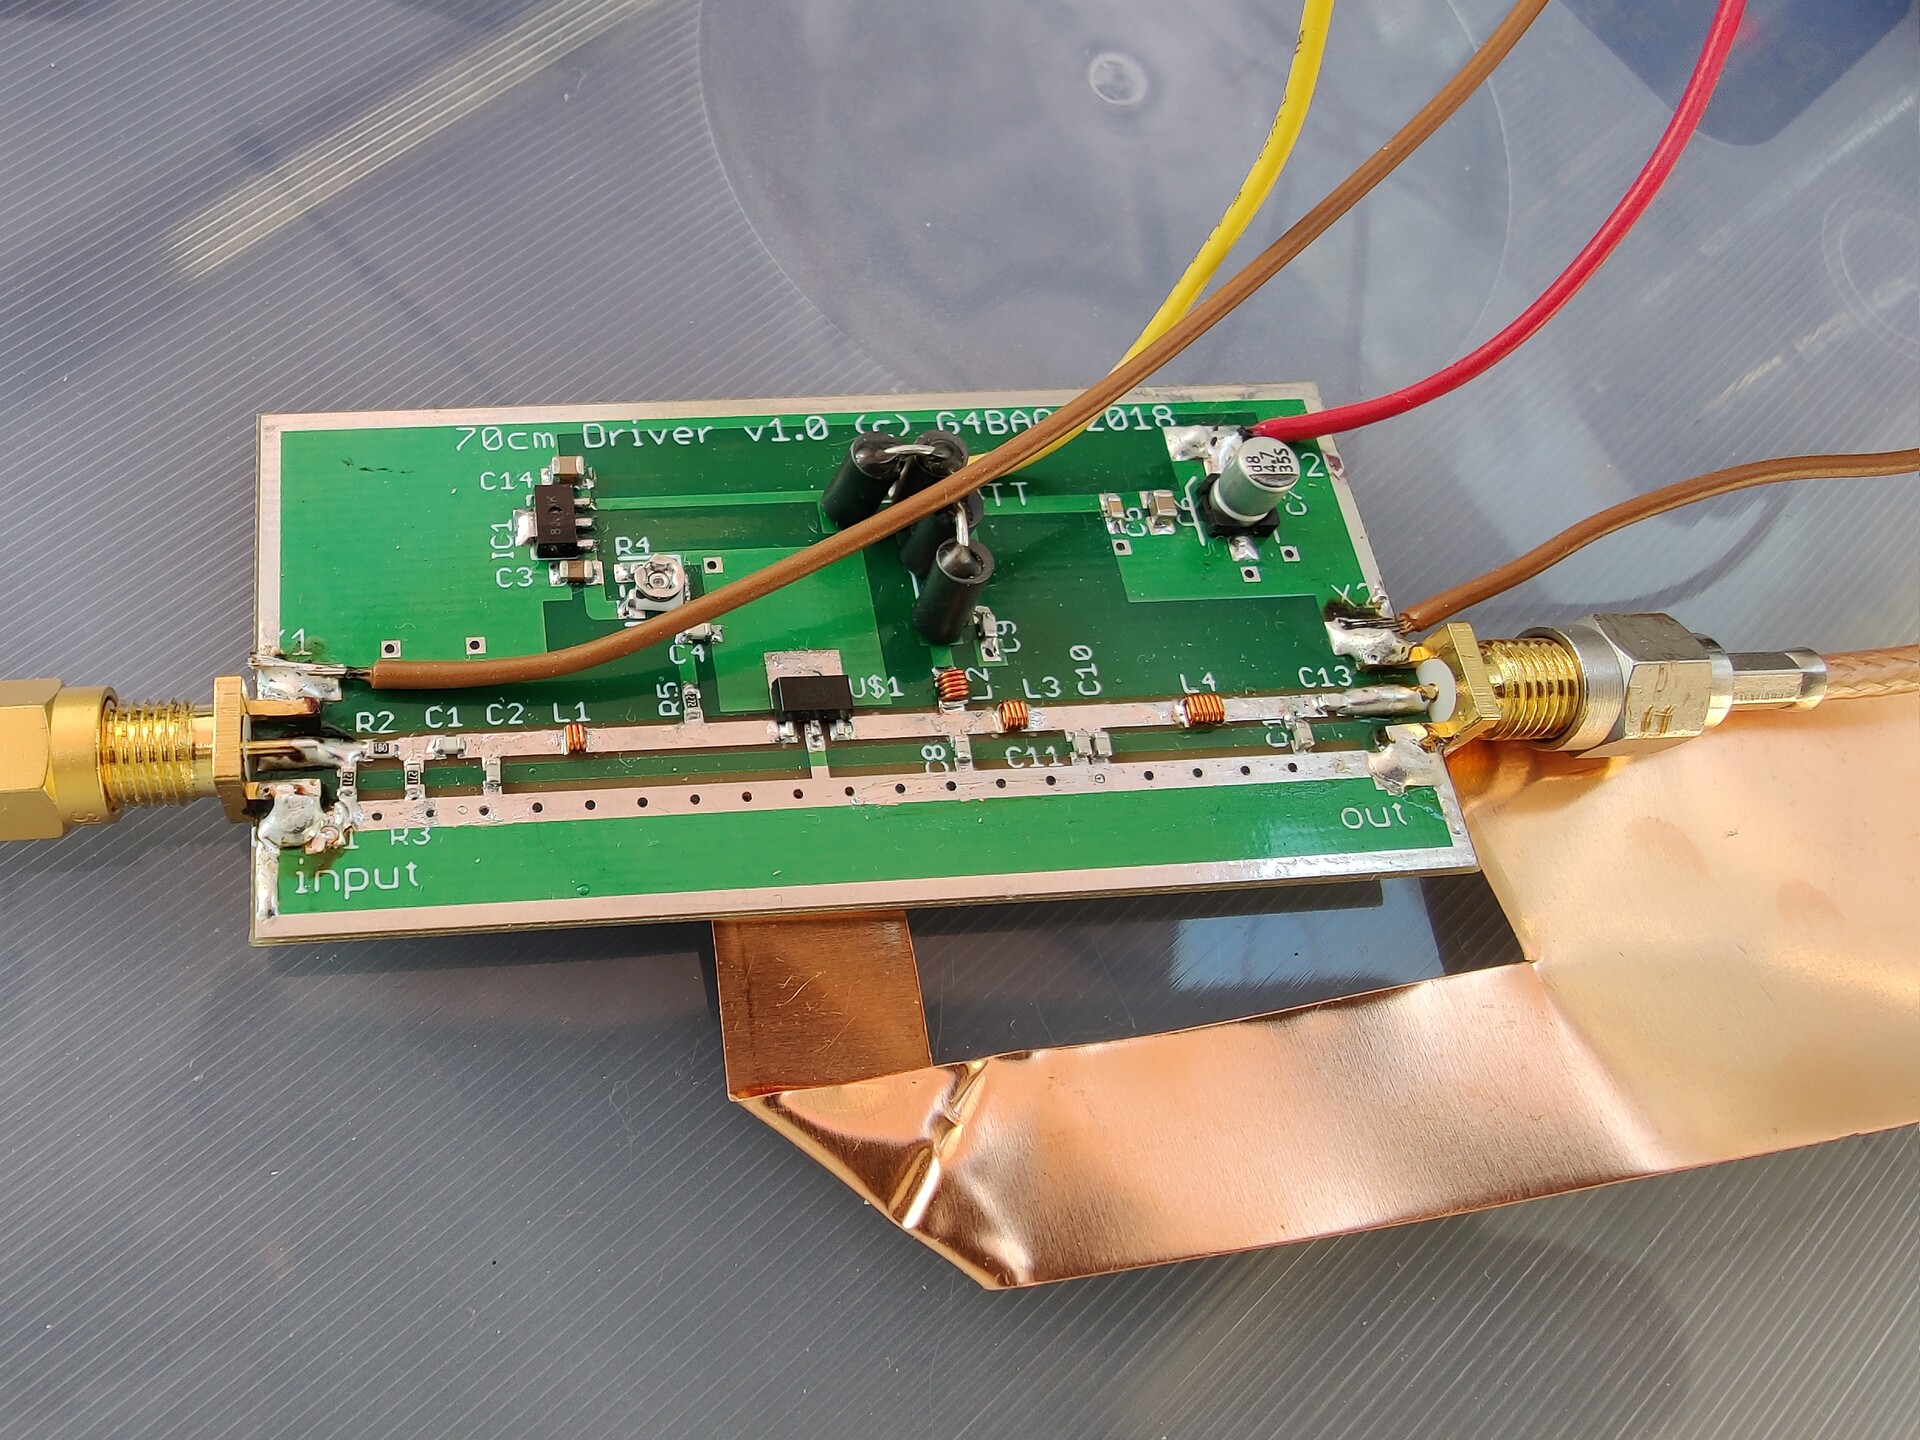
DVB-S1 video transmitter for 70cm band
The DVB-S1 live video transmitter follows the hardware setup Australian Amateur Radio Experimenters Group (AREG) has used in March 2021 on their Project Horus 55 flight.
-
Hardware:
-
Raspberry Pi Zero running DVBSDR VK5QI fork used for Project Horus 55 flight
-
LimeSDR Mini for outputting RF (provides ~10mW of output at 433MHz)
-
G4BAO 70cm power amplifier for ~800mW output at 12V voltage
-
-
Frequency: 433.250 MHz, Bandwidth: 500 kHz
-
Resolution: 720x405 pixels, Frame rate: 25 FPS
-
Transmit power: 700-800 mW (power will drop as battery voltage drops)
-
Antenna: Quadrifilar Helical antenna for right-handed (RHCP) circular polarization (built by Jari OH3UW)
-
Powered by: 8x Energizer Ultimate Lithium batteries for 12V voltage and good performance in extremely low temperatures

DVB-S1 video stream parameters:
-
Symbol rate: 400 kilosymbols/second
-
Forward error correction: FEC 1/2
Setting up DVB-S video reception: The DVB-S1 video stream does not follow the standard DVB-S video stream parameters to make the transmission more robust and make it fit the 500 kHz bandwidth available for us. This means that you will need to use a computer and an SDR receiver, such as the affordable RTL-SDR USB stick, and suitable software to decode the video stream.
The antenna for receiving the DVB-S1 transmission should be a high-gain yagi pointed at the balloon. Reception should use right-handed circular polarization (RHCP). An LNA amplifier usually helps reception with weak signal levels. The range of the video transmission is expected to be around 100-200 kilometers. The 2m APRS tracker transmissions should get automatically picked up by local APRS repeaters and IGate devices, so it should be possible to follow the balloon location in aprs.fi.
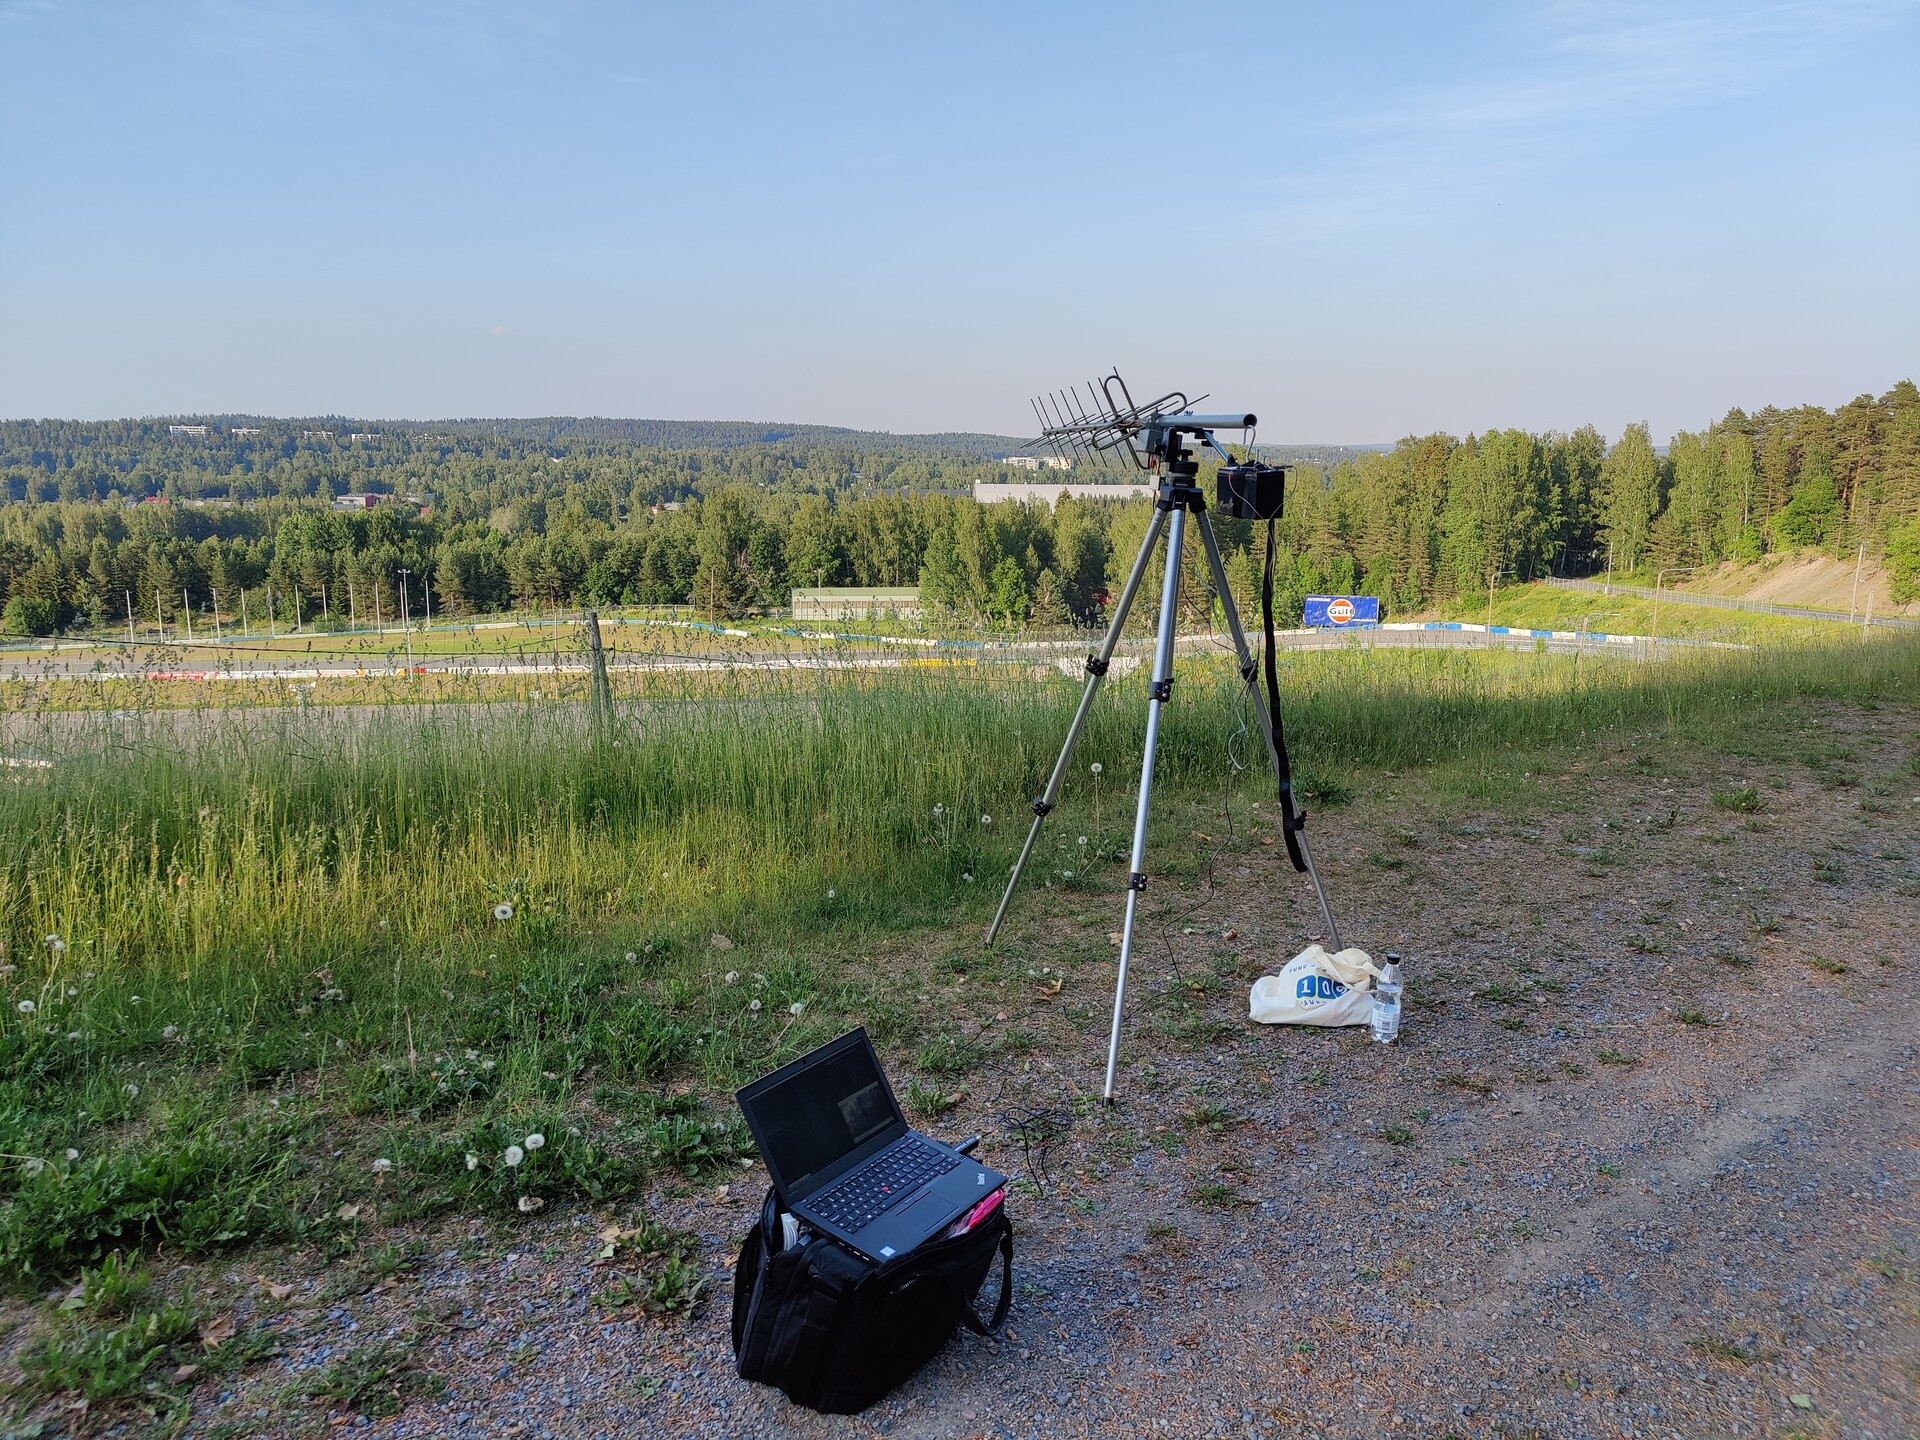
We have tested the following two software solutions for receiving the DVB-S stream:
Using SDRAngel for DVB-S reception
SDRAngel runs on Windows, macOS and Linux, and it offers an easy-to-use DATV demodulator with a graphical user interface. A regular RTL-SDR receiver USB stick is enough for the reception.
You can follow the instructions written for the AREG Project Horus flights on how to install RTL-SDR drivers and SDRAngel on Windows. The OH3VHH flight uses slightly different parameters: the symbol rate is 400000 symbols per second, and the frequency is 433.250 MHz. Forward Error Correction (FEC) setting is 1/2.

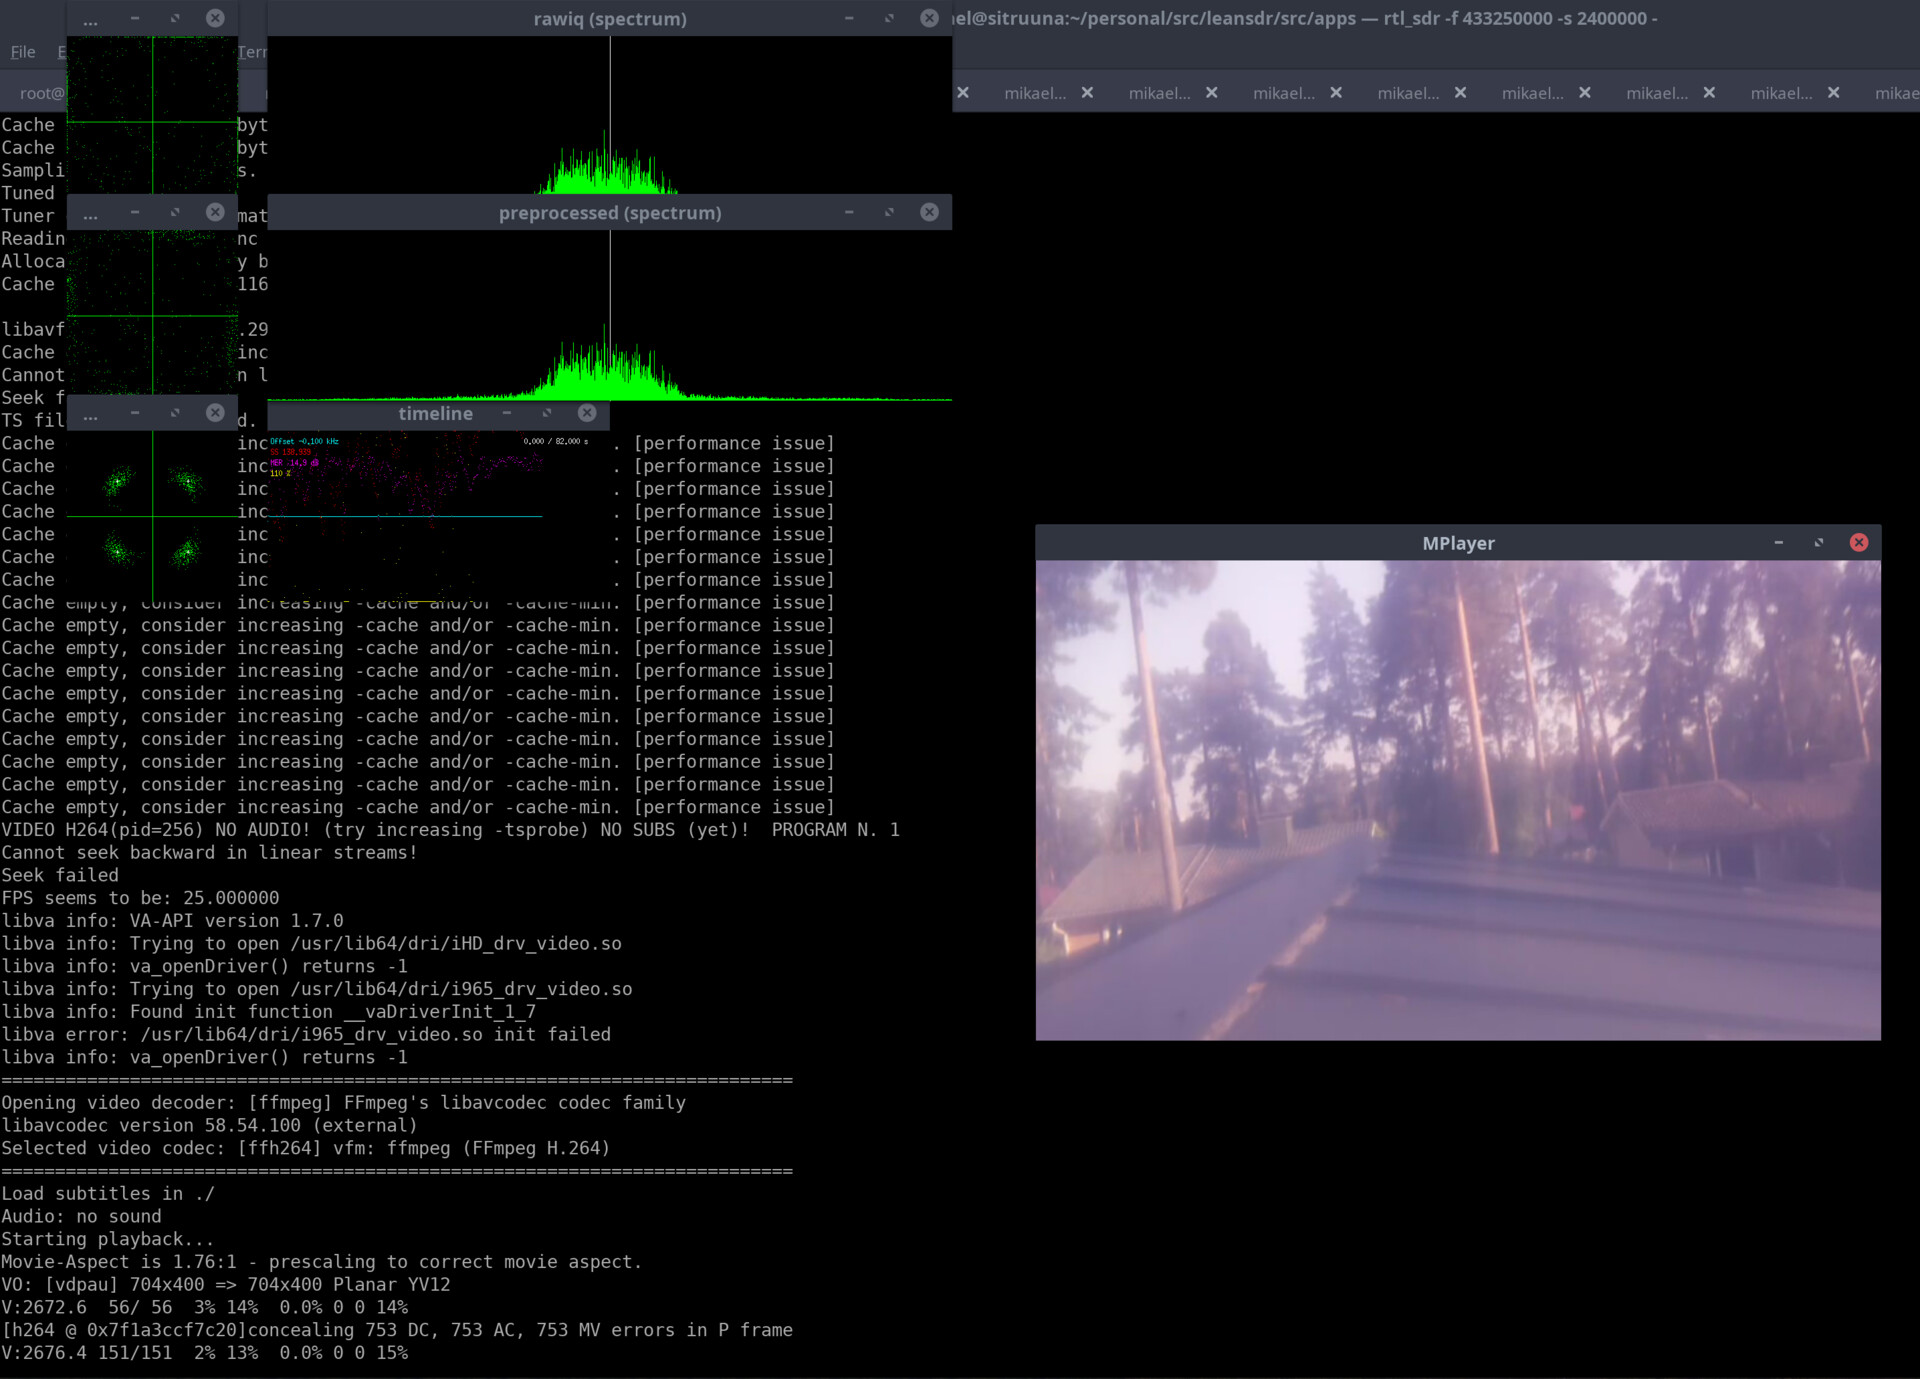
Using leandvb for DVB-S reception (Linux only)
A Linux-based alternative to DVB-S reception is to use the leandvb open-source software available for download in leansdr GitHub repository. You will need some experience in compiling software from source code to use this method.
Here’s an example command to display the video stream and to save it to disk simultaneously:
rtl_sdr -f 433250000 -s 2400000 - | ./leandvb --gui -f 2400e3 --sr 400e3 --cr 1/2 | tee oh3vhh-stream-1.ts | mplayer -cache 128 -
This command assumes you are using an RTL-SDR receiver and that you have mplayer media player software installed. The command saves the video stream to file oh3vhh-stream-1.ts for later use.
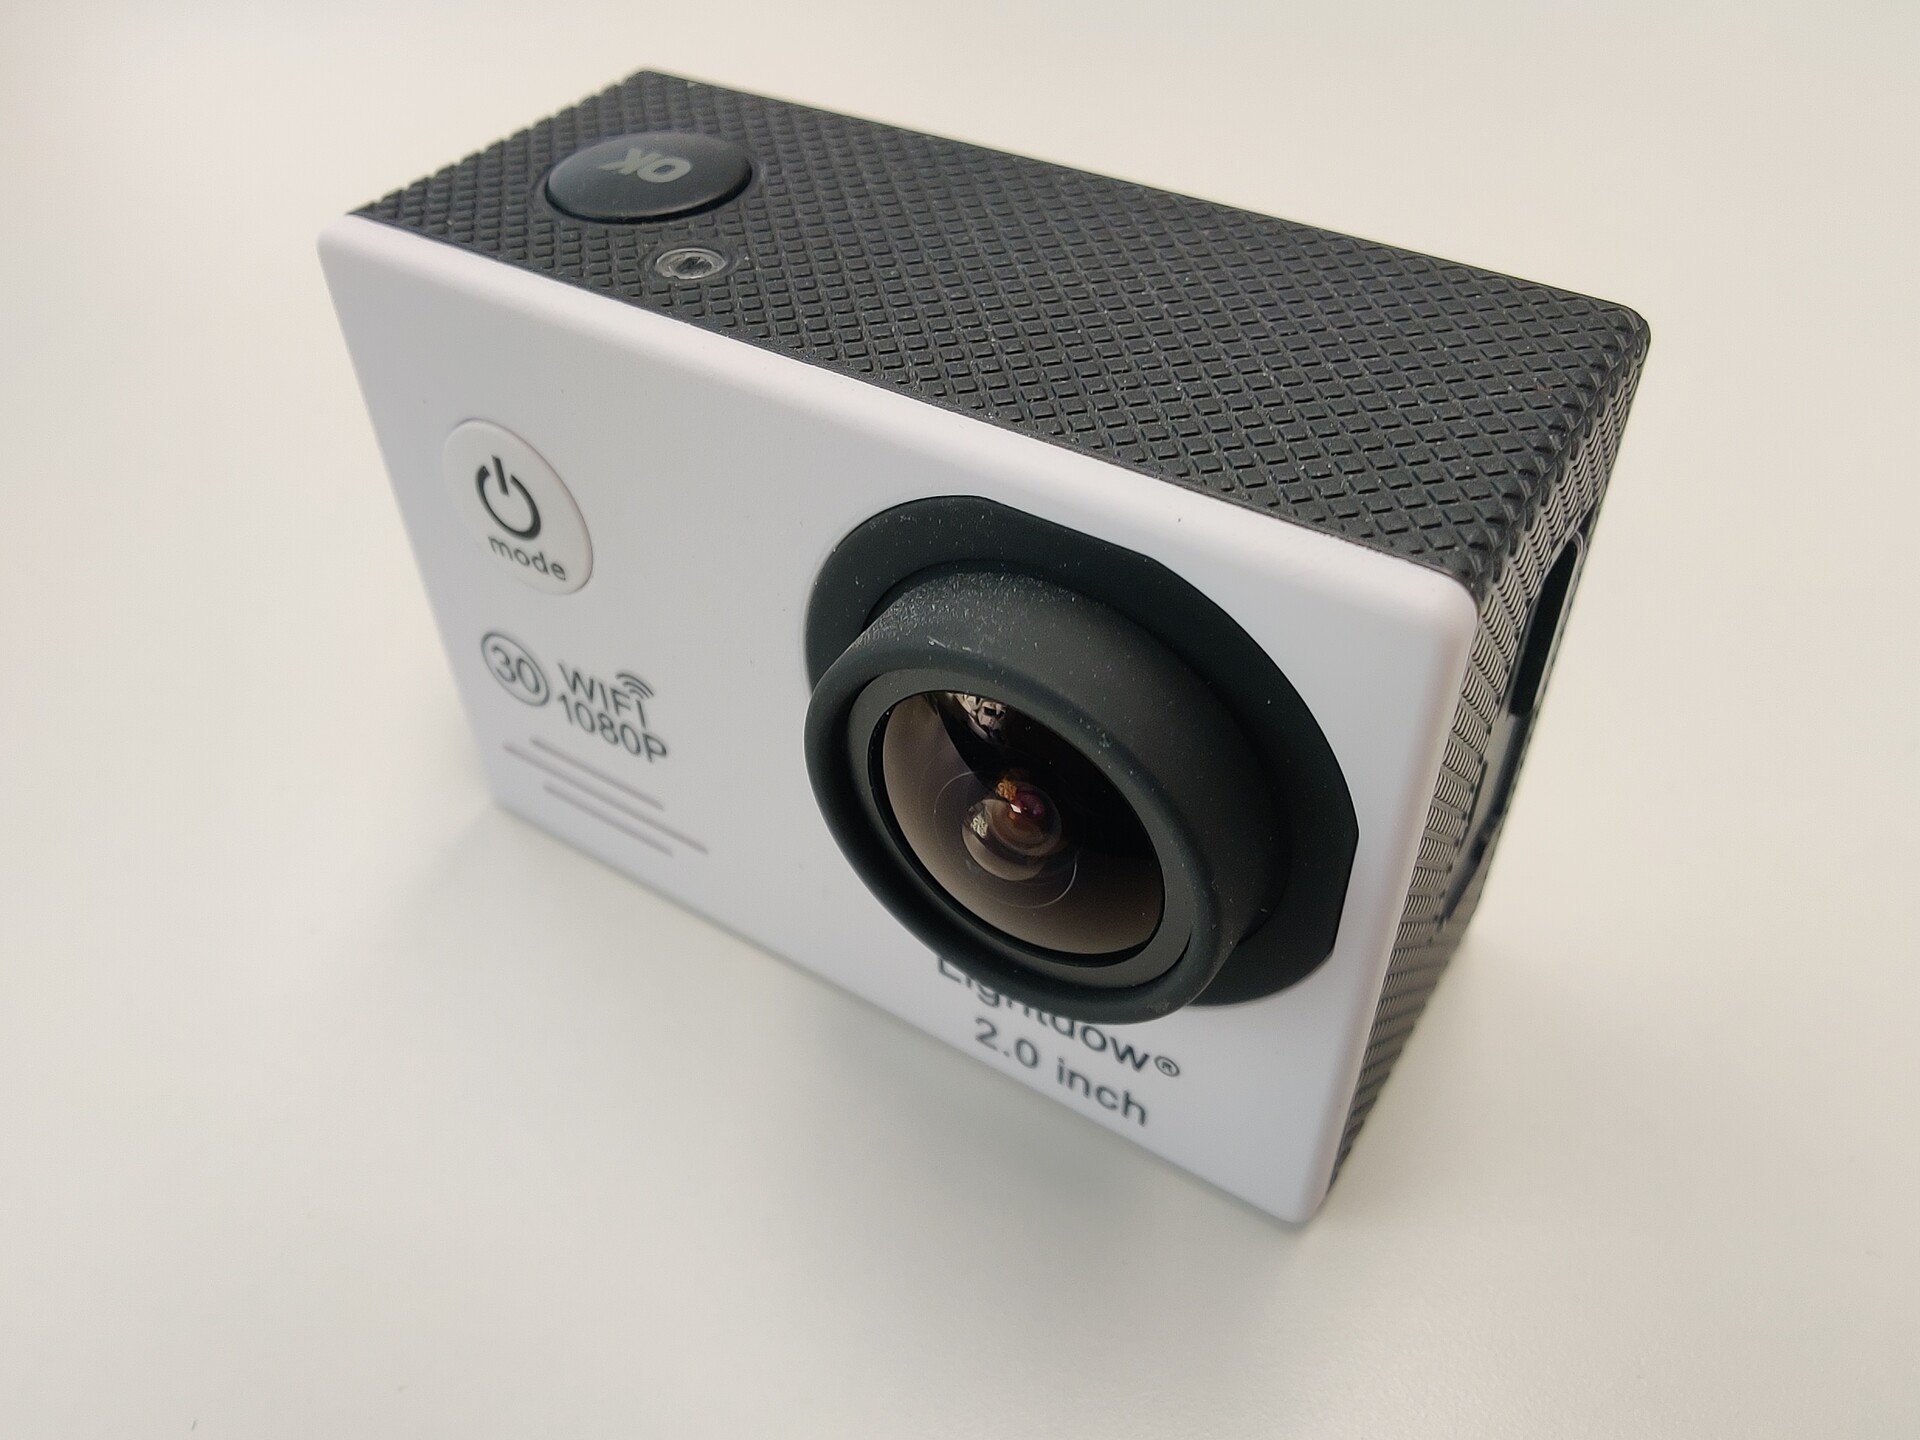
Photography/video equipment
-
Still photo camera: Raspberry Pi High Quality camera with a 6mm wide angle lens as a part of Embedded Radio Tracker setup
-
Takes a photo approximately every 30 seconds
-
-
Two Lightdow LD6000 Full HD video cameras facing sideways
-
Both cameras are powered by external, rechargeable 2500mAh 18650 Li-Ion batteries and 500mA voltage boosters for USB charging voltage
-
Follow us for more updates
We will post updates about the flight both on this page and as new posts on the 0xfeed.tech blog as we make progress with the flight preparations and the actual flight.
You can also follow me on Twitter at @mikaelnou where I will share updates regarding the OH3VHH flight!